
Two quick ways to turn your motorcycle around in a tight spot. One using engine power and one using no power.
Coach Ramey Stroud operates a world class motorcycle training centre from his 60 acre ranch in Oregon. He's a former desert racer, rally and enduro rider, has completed several IronButt events. He works with professional racers and endurance riders, as well as adventure riders.
Website: http://ridecoach.com
SPIN TURN
• engine running
• lift bike to vertical, raise side stand
• turn off traction control
• click in to 1st gear
• handlebar full left lock
• step back and lean bike in to your right hip and find balance point (heavy on the hip)
• inside arm straight - meaning a bit of a lean (this is key - if it’s too vertical it will not turn)
• boots turned slightly towards direction of travel with left boot turned a little more and outward
• eyes towards the direction you want the bike to turn to
• raise RPM and hold steady (not too high)
• let clutch out quickly to break traction (clutch is your control - not throttle)
• wheel begins to spin and rotate bike around you
• stop the bike by pulling the clutch in
Motorcycle SIDE STAND TURN - ON LEFT SIDE
• passenger pegs up
• engine off
• handle bar full right
• reach across with left hand to throttle grip
• pull up till your front wheel is off the ground
• find the balance point
• reach back with right hand - grab rear of bike
• lift up and forward till both wheels are off the ground
• side step the bike around the centre stand
DISCLAIMER: This segment is not intended as a substitute for taking a rider training course. We recommend that you work with a professional trainer before trying any of the techniques discussed, or do so at your own risk. Canoe West Media, Adventure Rider Radio and Coach Ramey Stroud do not assume any responsibilities for injury and damages, including and not limited to, yourself, another person, motorcycle, etc.
TRANSCRIPT:
Interviewer: Jim Martin | Guest: Coach Ramey Stroud | Photos: Coach Ramey Stroud
This transcript has been created from the original audio episode released May 10, 2018. This transcript may have been modified to make reading easier. As Adventure Rider Radio shows are meant to be listened to and not read, the following script may contain some grammatical and other errors. You can also listen to this interview by downloading the episode.
INTRO
Jim (Narrate): When you’ve got to turn your motorcycle around in a tight spot…let’s say you went down a tight trail, and you found you have to turn around, and go in the opposite direction…or any spot at all. Maybe it’s even in your garage; where you pulled in, and you’ve got to get your bike back out, and it seems like a hassle to get it turned around. What method do you use? Do you use the back and forth method, where you sit on the seat and you’re moving the bike forward (and possibly using the power of the engine), and pushing it backward? That’s a common one. Or maybe, get off it, and you actually shove the bike, physically; backward, forward, until you get it turned around… Well, today, on our exclusive Rider Skills Segment, we’ve got Coach Ramey Stroud back, and he has two methods for us for turning our motorcycles around in tight spaces. One, with the engine off, using counter balancing…and the other, with the engine running, using the bikes own power for a fast spin. I’m Jim Martin, this is Adventure Rider Radio. Stay with us; we’ve got a good one for you.
INTERVIEW
Jim (Narrate): And now, for our Adventure Rider Radio exclusive Rider Skills Segment, where we talk ideas and concepts, and methods, that can help you improve your riding skills. And of course, this episode is not to be a substitute for professional training, or an endorsement of any particular technique. These are ideas and concepts that, if you choose to try, are clearly performed at your own risk. Our instructor today is Coach Ramey Stroud.
Jim: Coach Ramey Stroud, welcome back to Adventure Rider Radio.
Ramey: Thank you. It’s good to be back.
Jim: You are…when we were talking one time before, you had mentioned about your heading to the…or your planning to go to…the Alcan 5000. That’s for next year, is it?
Ramey: No, that’s this year. It’s at the end of April. We’ll be setting up, and heading out.
Jim: So is that the…is there two Alcon 5000’s? One winter one, and then one sort of summer one?
Ramey: Yes. There’s one that they don’t allow bikes in. That’s right in the middle of winter, and it’s pretty hardcore ice roads. They have ice racing during the event. It’s a lot of fun. I offered to go on a bike one time, with heated gear and all that stuff, and they just kind of looked at me like- what tree did you hit?
Jim: What made you this way?
Ramey: Yeah.
Jim: Well, when it gets like super cold temperatures…like minus 80 degrees or something. Don’t they? Fahrenheit?
Ramey: Oh, yeah. Well, they do, they do. But you’ve got to remember; I’m sponsoring a guy that’s building a bike to ride to the North pole solo. So he’s really coached me over the years. He’s the one who wrote the book about riding up to Bay in the middle of winter on his R1. So, it’s doable. Most people don’t really have a clue how it would be done.
Jim: So you’re doing the summer version, then? Supposedly…supposed summer version, I guess.
Ramey: Yeah. The last time I did it, it snowed on us in August. So it’s summer version, but we expect a lot of rain, and maybe even a little of the white stuff.
Jim: And what are you riding?
Ramey: I’m going to ride the same bike I rode on the first Alcon that they allowed bikes into. It’s a 2001 BMW R1150 GS. I just shipped it back from Europe, and we just stripped it down, and rebuild the suspension, and went through the . Same bike, same computers, same rally equipment…only now, it’s got a side-car.
Jim: Well, we’re going to get to turning our bikes around, but I’m curious…so just quickly; tell us what the Alcon 5000’s all about.
Ramey: Well, it’s a different kind of competition. It’s call a TSD rally. It stands for time, speed, distance. So, it’s kind of like the Dakar in that there are competition sections, and they are connected by transfer sections. So, a transfer section is basically driving on the streets, within all of the rules and laws, to get to competition sections. They’re connected. So you get to a competition section, and there’s a timer there. They will give you a start at a precise second. All through this competition section, you have to maintain an exact speed. And the speeds will change, depending on the terrain. But the problem is that a lot of the terrain is rough, and you can’t maintain the given speed. So you have to speed up on the other side of these delays to get back on time. And, all the while that you’re managing your time, you have to manage the route, because they don’t give you a GPS route. You have to look at something called a road-book. On my bike, it’s a box between the handle bars that’s controlled by an electric motor that’s switched by my left thumb. So, I’m looking at the rally computer, I’m looking at the road-book, I’m watching the bike, I’m trying to deal with terrain… There’s a lot going on. It’s tougher than it looks like. You’ll be passing checkpoints; if you show up 1 second early, or 1 second late, that’s a point. For every second, it’s a point. So the idea is to get through a competition section with zero points. A lot of it is off-road, gravel, hills, water-crossing, stuff like that. So you’re paying attention to the bike, and if you’re down some time…then how fast do you have to go to get back up on that given time? I don’t know, it’s challenging, it’s fun…but, bottom line, it’s an endurance event. You’re doing 5,000 miles in about 7 or 8 days.
Jim: Wow.
Ramey: So you’re pushing pretty hard, and you’re thinking- you need to train for it, or it’s not going to be a lot of fun.
Jim: And when do you leave for this?
Ramey: I think we show up at the start the second or third week of August. The 21st, or something like that.
Jim: So you’re going to be dealing with bugs as well at that point.
Ramey: Well, hopefully not. I mean, by then, most of the mosquitoes are gone. But, I’ve been up there before where it was absolutely crazy. You’d stop at a construction zone, there’d be a flagger that holds you up for a little while, and the mosquitoes would come around. They’d be buzzing around your head. One time I heard two of them talking. They said- shall we eat him here, or take him home?
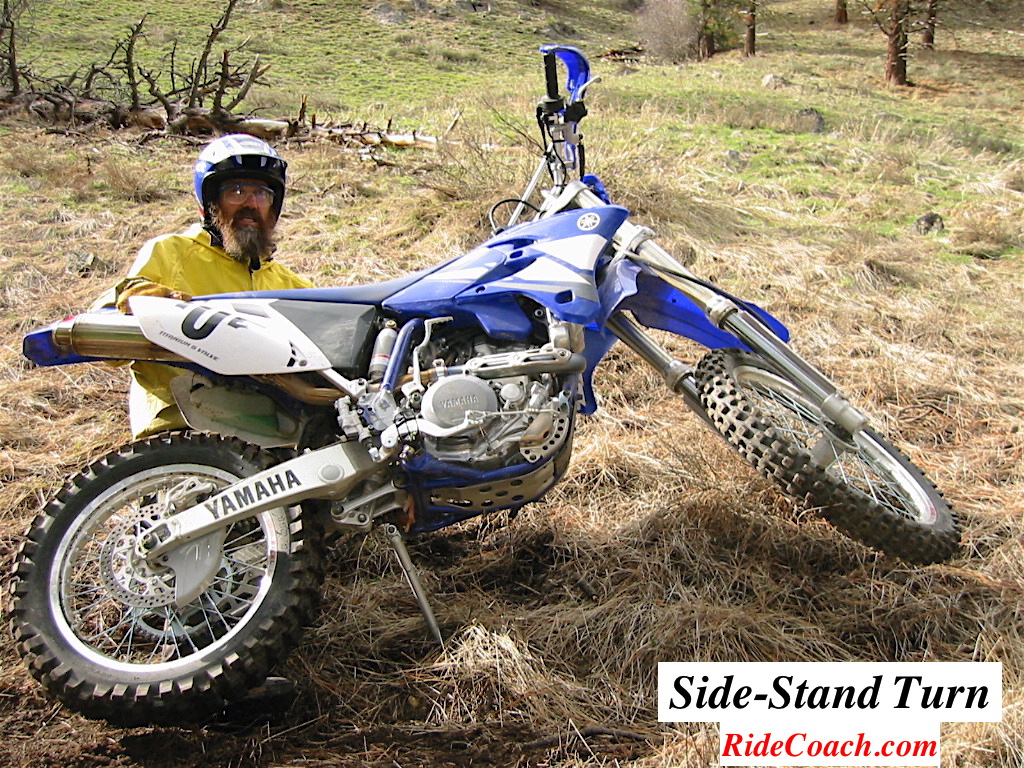
Jim: Well, today we’re going to discuss turning our bikes around on a narrow trail. You’ve got your big adventure bike, you’ve ridden to a spot where inevitably, it ends. You find yourself having to turn around for whatever reason. Often that turn-around is such a chore, and a lot of times, that’s where people will drop a bike. Because as you’re turning around, it’s bumping back and forth on the rocks etc. But we’ve got a couple of turns here that may be good, depending on how much space we have. The first one we’re going to start with is a side-stand turn.
Ramey: Yeah. This goes back to the idea of the Riders Toolbox. There are a lot of different ways to turn a bike around. In a very tight narrow situation, these are just a couple more tools that you have available to you, if you need them. The side-stand turn is basically balancing the bike on the side stand with both wheels off the ground (it sounds crazy, but it’s actually a lot easier than it sounds), and spinning around on the side-stand. So you can do a 180 degree rotation with very little effort. You’ve just got to know a few of the little tricks of the trade.
Jim: So, I guess before we start into this, maybe the first thing we should talk about is side-stand strength. Because, I think that probably, we’ll have a lot of people scratching their head thinking- all the weight of the motorcycle on the side-stand?
Ramey: Yeah, and it varies so widely between the manufacturers and the different models of the bikes. It turns out that some of the strongest side-stands are on the adventure bikes, because they’re engineered for the weight, and some of the weaker stands are on dirt bikes. But, bottom line is, you’ve got to be able to take a look at your side stand and figure out- is it stout, is the mounting lug okay? Just- what sort of weight’s it going to take? There’s a few little tests that you can do that kind of give you some feedback. But you can also check online and see if anyone else is doing side-stand turns, or if they’ve had any problems, whatever. But the other thing is that, a lot of times we just accept the bikes from the manufacturers as is. We’re changing the side-stands around all the time on the bikes that come into the school here. For example; if they’re doing a suspension change (either lower the bike, or raising the bike), then the side-stand’s the wrong length. So, they’ll either have to shorten it, or lengthen it. Well, most of the side-stands are hollow. So when we make the cut on the side-stand, it’s an opportunity to insert a steel rod into the side-stand, so that when we weld it back, it’s much stranger than it was. Also, at the same time, you see all these after market side-stand feet (that you bolt onto the bottom of the side-stand). Well, if we’ve got it off, and we’re welding on it, we’ll just weld a little bigger piece of metal on the bottom, and give it a bigger foot. So, you can take it from the factory, or you can beef it up a little bit. Either way, you’ve just got to make sure it’s strong enough to do what we’re going to talk about.
Jim: That’s a really good tip, because most of us want a bigger foot pad on it. And, like you say, if you’re going to be in there doing something, may as well strengthen it up at the same time as getting a larger pad on. So that’s an excellent tip. But also, I like what you said about checking online. Really good thing to do; take your model of bike, and just look it up. See if other people are doing it and having problems with it. I think that’ll show up pretty quick for us.
Ramey: Sure. But I’ll tell you what; it’s worth the effort to put it together, because once you learn how to do a side-stand turn, it’s a great tool. When I was a young racer, I used to work in the motorcycle shop that would sponsor me. I’d watch the salesmen out on the salesroom floor. They’d spin these bikes around…create a new presentation of the bikes to the customers. They’re moving 10/20/30 bikes just in a matter of a few minutes, spinning around. I was like- how do they do that? So, I go over there and say- okay, I want to learn how to do this. It just got to be so easy, and so quick, and so fast…it’s a no-brainer. You don’t think about it once you learn how to do it.
Jim: So what’s the deal then? What do we do for our set up? We’ve ridden up to a spot, we’re stopped…how do we set this up?
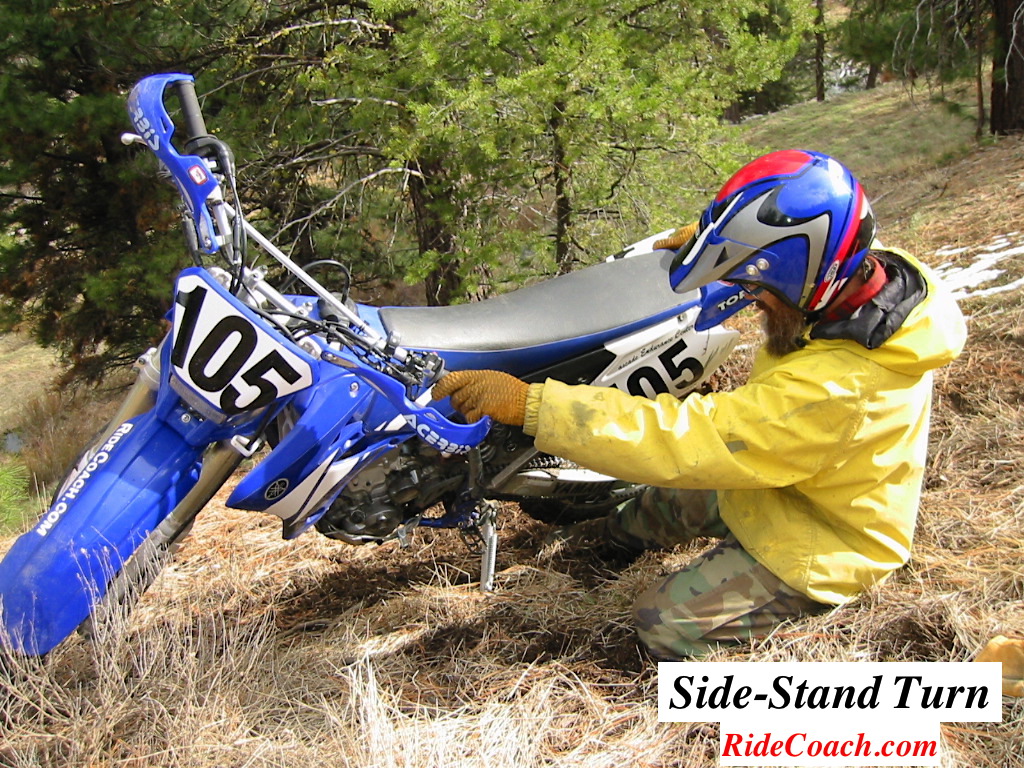
Ramey: Well, the first thing is, for me, we spend a lot of time just going through the steps mentally. When you’re going to do something like this, it’s really important to have a mental picture of what you’re trying to accomplish. So that’s kind of one of the values of being here today. We’re going to create a mental picture of the step by step process to do a side-stand turn, and later, a spinning turn. So, let’s get started then. First thing, if you do have passenger pegs/pillion pegs, fold them up before you begin. A lot of times when you’re spinning the bike around, you’ll bump into them. So get them out of the way. Next is, the engine doesn’t have to be on. As a matter of fact, it’s easier and safer, if the engine is off. Then you’re going to be standing on the side-stand side of the bike, which is usually the left. By the way, Jim; do you know why the side stand’s on the left?
Jim: I don’t.
Ramey: Well, it’s because of this guy that lived about a thousand years ago, who was a black smith. It was when they were starting to work with bronze and other metals. They were starting to forge knives. The knives obviously had a lot of value in society. But eventually, they worked into the military, too. They were carrying knives for combat. A short knife is good, so a long knife is better, and they started making swords. Most of us are right handed, so if we’re wearing a sword on our belt, we can’t wear the sword on our right side, because it’s too hard to draw it with our left hand. So we’d always wear the sword on our left side, so they could draw it across their body. Well, a lot of the swordsman/the fighters, would ride horses. Back in those days, they would mount the horses from either side, depending where they happened to be at the time. But once they started wearing swords, when they got on from the right side, the sword would slap the horse in the butt as they swung their leg over, and the horse would move around and make mounting a little tough. So these guys were pretty smart. They started always mounting from the left to keep the sword away from the horse. Well, eventually, that became the standard for horses. And then, when our horses became iron horses, guess which side the side-stands went on?
Jim: That is a really neat story. You know, I grew up riding horses, and we always got on the left side, same as you would a motorcycle. I never really thought that much about it. But that’s the side we always got on, and I never had a sword.
Ramey: Yeah, well, that’s because you’re a product of society. I have noted over the years, a few bikes, mostly trial bikes, where the side-stand’s on the right side. But, for the most part, we’re just stuck on the left. So, anyway, if you’re going to be doing a side-stand turn, you’re going to be standing the left side of your bike. Then, you turn your handlebars full-lock to the right, away from you. Then just reach across with your left hand, and put it on the throttle grip. So now, the bike’s sitting there on both wheels, with the side-stands touching in three points. Your left hand’s on the throttle grip. Then you just pull back towards you, until the front wheel comes up off the ground a little bit. Now, this is not a strength move. It’s a balance move. You’re balancing the bike on the side stand, and the rear wheel. So when that front wheel comes off the ground, once you get to the true balance point, you can hold it with two fingers. If you’re working too hard, something’s wrong. It’s not a strength move, it’s a balance move. So then, once you get the front wheel up, and you’re in the balance point, then your right hand goes on the back of the bike. You’ll find something back there, either a panier rack, or a grab bar, or pillion bar…something that you can hang on to. Your right hand is then going to be able to lift forward, and up a little bit. Pretty soon, the rear wheel will come of the ground. It’s counter-balancing off the side-stand as well. You’re there with the bike into your right hip, and both wheels are off the ground. You’re just balanced on the side-stand. Again, it’s not a big strength move. It’s more about balance and technique. So if you can visualize just there, balancing on the side-stand (which quick frankly sounds little weird until you do it), then you’re ready to actually make the turn. The way you do that’s real simple. You just walk the bike around the side-stand. You’re doing side-steps. Just little itty bitty side-steps. You just walk it around, and you can do 180 degrees and stop, is what we normally do. But realistically, you could do it all the way around if you wanted to. You’re just pivoting the bike on the side-stand by walking it around. Clock-wise direction.
Jim: And once you get the feel of it, it happens very quickly. I mean, it’s really rather shocking how quickly you can whip the bike around, once you get the hang of doing it.
Ramey: Yeah. I mean, it sounds like- oh man, this is going to be dangerous, this is going to be heavy, I’m going to drop the bike- and so on. But, once you learn how to do it, it’s kind of like- this is a no-brainer. The beauty of it is, if for some reason you get in trouble while you’re walking it around, just stop. But the wheels back down on the ground. You can stop at any time during the turn, and put both wheels back down very easily. Just don’t push the bike down so fast that it wants to go over to the right side away from the side-stand. Just push it down, and keep it on the side-stand. That’s it.
Jim: While you’re balancing it, it’s up against your upper thighs while you’re doing your turn. So that prevents it coming towards you. So, like you said, if you feel like you need to let it down, it’s sort of natural to let it down so it goes away from you. It just sits there on the side-stand.
Ramey: Exactly, exactly. The steps that go into it are the key. You just get the front wheel off the ground first, take a breath, grab the back of the bike with your right hand, and get the rear wheel off the ground, take a breath, do your side-steps, change your direction, and put the bike back down. Get on, and drive away.
Jim: So the precautions with this…obviously we already talked about side-stand strength; look into that. But the other thing too is, you need a fairly solid surface to do this on. You certainly can’t do this on mud or soft ground, obviously.
Ramey: Exactly. We were talking about a bigger foot on the bottom of the side stand. We can do side-stand turns on any surface, but if it’s soft and it digs in, then it’s going be a little more difficult. (Depending on how far it digs in.) I’ve done side-stand turns on pavement, but it was a hot day and the pavement got a little soft. So it kind of dug a little divot in the pavement.
Jim: It’s okay if it’s not your pavement, but if it’s your driveway, you’ll be bloody ticked off.
Ramey: Yeah. I won’t be doing any side-stand turns in your driveway.
Jim: I guess if you wanted to do it in your driveway to practice, you could throw a piece of plywood down, and then put the side-stand out. Provided that it wasn’t too thick that it topples the bike over the other way, or doesn’t have it sit properly. But that would be a spot where you could practice.
Ramey: Or you could take a can, and cut both ends of it out, and stomp on the can. That way you’ve got a cheat foot to put under your side-stand, and do a spin.
Jim: Now, to practice this thing, to get the hang of it…do you suggest that people start off by just lifting up the front, and sort of getting that balance point there? Then moving to the back? Is that how you’d walk through it?
Ramey: Yeah. Normally, once they kind of get an idea of what it feels like, and what the balance point is, it just make sense when the front wheels up, to bring the rear wheel up. But you could do that if you wanted to. Just bring the front wheel up, find the balance point, and then put it back down. But don’t try to bring the rear wheel up before the front wheel. The front wheel’s got to come up before the rear wheel.
Jim: So, we don’t really need to do an assignment so much for this, do we? Or did you have something in mind?
Ramey: Not really. I mean, if they’ll…you’re going to put the steps up on the website, aren’t you?
Jim: Yeah, I am, yep.
Ramey: Okay, well, they can just do a quick little print out of that, and use that as kind of a cheat sheet. If they really need to work on confidence until they’ve done it a couple of times, have a buddy come over and spot for you. Then take turns. Spot for each other. But the reality of it is, once you get it, you can do it on a trail, you can do it in your garage. A lot of times you’ll drive in, and then you don’t want to back the bike up out of the door. Well, spin it around in the garage, and you go in forward, and go out forward. It’s just a simple little process that will turn the bike around on it’s own length.
Jim: Okay, so. Just a very quick recap of what we’ve just said here?
Ramey: Sure. So, passenger pegs up. Engine off. Face the bike on the side-stand side. Feet about shoulder width apart. Handlebars full right. Reach down with your left hand to the throttle grip. Then pull the bike up to your until the front wheel comes off the ground. Then find that two-finger balance point, right there between the side-stand, and the rear wheel. Then reach back with your right hand to the rear of the bike, and find a good hand hold. You pull up and forward until both wheels are off the ground. Then you side-step the bike clockwise to however far your’e going to go. 180 degrees, or more.
Jim: Okay. That is simple, and very effective. Now, the next one that we’re going to talk about is a little more fun, I guess, and has a bit of a pizzaz to it.
Ramey: The thing about spin turns is, just like the side-stand turn, it’s a really good tool, but if your buddies are around, it’s really cool way to show off, too.
BREAK
INTERVIEW (Con’t)
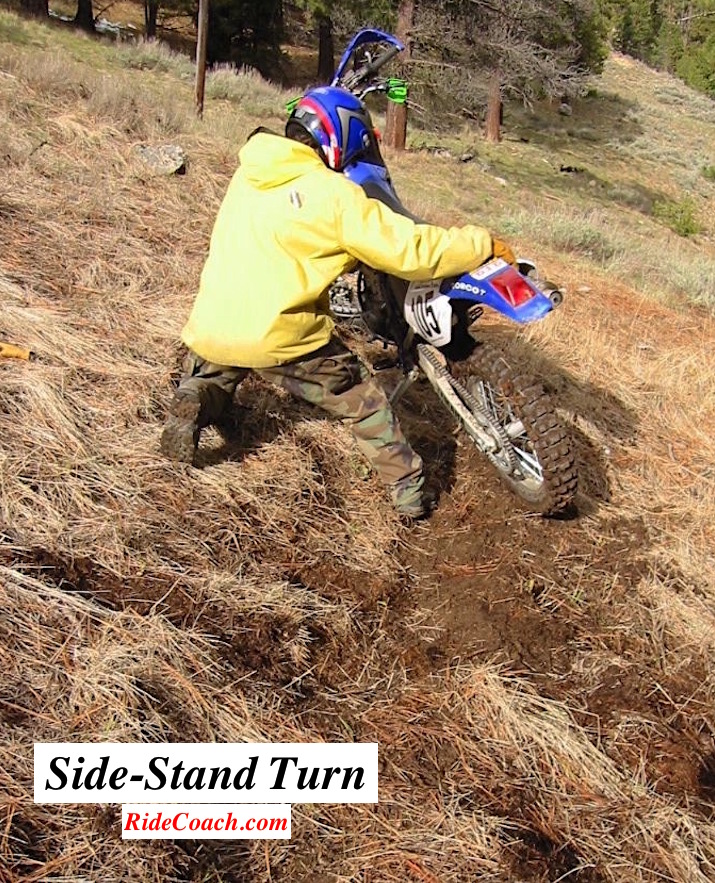
Jim (Narrate): Okay, so we’re back to Coach Ramey Stroud, and talking about doing our turns. We’ve done the side-stand turn already. Now, we’re going to do a spin turn, which is a powered turn. It should be just as effective, although, a little bit cooler (I think) than the side-stand turn.
Jim: And this one, what we’re doing is using engine power on the spin turn, as opposed to having the engine shut off on the side-stand turn.
Ramey: Exactly, exactly. Now, if we were sitting on the bike, and doing this spin turn, we’d be cutting donuts. It’s an old term. You’ve seen it on YouTube, and maybe you’ve seen people doing it in real life. The reality is, we learn to do it standing next to the bike, before we learn to do it sitting on the bike. So today, let’s talk about standing spin turns.
Jim: So, for the standing spin turn, just the overall concept of it, as I said, we’re using the engine power to spin this around. Basically, what we’re doing is, we’re standing with the bike, we’re tilting it over, we’re giving it some throttle, and little the engine turn the rear wheel, and actually spin the bike around us as we stand there. That’s the basic concept, is it?
Ramey: Yeah. Where we would use this might be…oh, let’s say we’re doing some trail riding, and we’re riding along a single track trail, and it comes into a dead end. Maybe a s small clearing between trees or rocks, or maybe even a dead end box canyon. You could push back and forth a few inches, and work, and work, and work, and work…or, you can do a spin turn, and be out of there in a few seconds.
Jim: One of the nice things about the spin turn is that, it’s a very controlled turn, if you’re doing it properly. When you’re sitting on the bike, and you’re going back and forth, you tend to or you can, get into positions where the bike goes up onto a rock or up onto a bit of a hill on your turn, raising your feet off the ground further, and you become unstable. So it can be an advantage in that way, in my mind. But the one thing I was going to mention, before we talk about how to do this, is that there’s one problem with it, isn’t there? With doing it this way, as far as the environment goes?
Ramey: Well, if you are in a relatively soft surface, when you’re doing a spinning turn, it’s going to creates some ruts. In other words, the spinning wheel’s going to dig up some dirt, and it’s going to leave a trail behind you. So, if you do do a spinning turn, and you are on public lands…after you finish the turn, put the bike on the side-stand, and go back and fill in your ruts. Just kick some dirt back in there, and try to leave the ground the same way you found it.
Jim: Okay. That makes sense. So how do we set this up, then? We’ve went into the trail, we’ve come to a stop, we have to turn ourselves around. We get off the bike…what do we do next?
Ramey: Well, if there’s a choice of where you’re going to do it (we were just talking about leaving ruts; that’s in a fairly soft surface), it’s a lot easier to learn to do this on a hard packed surface that’s fairly flat. It’s especially easy if there’s any kind of a loose thin layer on top of the hard pack. But it’s not something you want to learn with full knobbies on a soft surface. So, if you got a choice, pick your spot. That’s number one. Basically, there’s three easy parts to a spin turn. I’ll break them down individually, but the three parts is that…if you’re in the right body position next to the bike, the bike’s going to spin turn very easily. So your position is absolutely critical. The next is that you need plenty of lean angle. You need to have the bike leaning into you in order to make the turn. If it’s too upright, the bike’s going to go straight. Then the third thing to really think about is that the control of the turn is with the clutch, not the gas. One of the biggest mistakes that people make is that they try to use the throttle to control the turn and spin it around. It just doesn’t work that way. It’s your left hand on the clutch that controls the spin turn. Okay, so. Those are the three big things. Now, step-by-step. You’re going to stand on the left side of your bike, with your boots about shoulder width apart (in other words, you’ve got a good base), and lift the bike up to the vertical, and raise the side-stand. Start the bike (if it’s not already running). Then, for the big adventure bikes, if you can, turn off your traction control. Spin turns can be done with traction control, but it’s not going to be as effective. Control unit’s going to be in and out. It’s probably not going to feel as smooth. But if you can turn it off, that’s the thing to do. So then, click the bike down into first gear. Your handlebars are going to be full left, because the bike’s going to be moving around you in a counter-clockwise direction. You’re not going to be doing a spin turn with the bike moving away from you, because as the bike spins out, it’ll run into you. So, just think about it; it’s going to be a full left turn, and the bike’s going to be doing counter-clockwise around you. Then, lean the bike into your hip, and find that balance point, where if you wanted to, you could take your hands off the bars. The bike wouldn’t fall over because it’s leaning up against your hip. Pretty critical balance point. Now, if you’re on a slight angle, or depending on the height of your bike, or how tall your are, you still might need a little extra lean angle. If that’s the case, just take a slight step back, and let the bike lean further into your hip. The key there is keep your inside long and straight. If it’s down long, then you know you’ve got good lean angle, but if your elbow is bent and it’s up, then the bike’s going to be pretty upright. So your inside arm will give you some feedback of the lean angle.
Jim: So we’ve got the bike slightly leaned over onto us, just past the balance point. We’ve got the handlebars locked to the left.
Ramey: Yep. So, you want to have your boots kind of turned a little bit in the direction the bike’s going to go. Your inside boot (which in this case, it’d be your left one), is going to be slightly ahead of your right side boot. What we’re doing here is, we’re setting up that athletic stance. Not only for the start of the spin turn, but during the turn, so that you’ve got a good base.
Jim: So, when you said that left foot…sorry…when you said that left foot on the inside, you’re talking the inside of the turn. So-
Ramey: Exaclty.
Jim: Yep. So your left foot is to the inside of the turn, slightly forward, and turned in the direction that you want to spin the bike.
Ramey: Yep. I’m really detail oriented on this stuff when we’re doing the training, but most people are going to do this naturally. But we’re going to make sure. Okay, so then, next is your eyes. You need to look in the direction of your turn. A lot of people will look down, or even look at the bike. The bike’s there. You feel it. You’ve got good contact with it. Look where the bike’s going to go. Then add some gas, bring your RPM’s up, hold your RPM’s steady, then let the clutch out quickly. That’s going to break traction and get the wheels spinning. Then as the bike comes around, because you’ve got the bars to the left, you can control how fast it spins with your left hand. And then if you-
Jim: On the clutch.
Ramey: On the clutch. That’s it. Then if you have any problem, or you’re nervous about, and you just want to stop the turn; no problem. Just pull the clutch all the way in, the bike will stop.
Jim: Now, you said give it some throttle. How much throttle?
Ramey: Depends on the bike. Some bikes are heavier, and so they’re going to require a little bit more gas. It also depends on the surface, and the tire’s you’re running. So there’s not going to be any RMP number I can give you. But if you need to do a little test before you start doing spin turns, just get on the bike and put both feet on the ground, bring you RPM’s up a little bit, and kind of pop your clutch a little bit. See where your gas has got to be, and how fast you’ve got to pop the clutch to spin the tires. I’m not talking about doing a wheelie, or pulling away from a stop. Just spin the tires, go a couple of feet forward, and pull the clutch in. Spin the tire, clutch in. Spin the tire…and just get a feel for this bike on this surface- this is kind of what I need for power and clutch.
Jim: When you were saying about controlling the speed of the wheel with the clutch, you’re slipping the clutch once it’s broken free/once it’s broken traction to keep the wheel spinning slightly as it goes around. But we don’t want the wheel whipping, do we?
Ramey: No. By whipping, if the clutch was all the way out, the bike might be turning around you a little faster than you want. So the idea is that once the wheel is spinning, you can control how fast the bike’s going around you with your left hand. That’s left hand speed control.
Jim: Now, back to that lean angle at the start. How do we know if our lean angle isn’t enough?
Ramey: If when you let the clutch out, the bike doesn’t turn…even though it’s going to the left, it wants to go straight. Or, in other words, the lean angle creates as much of the turn as the bars going to the left. The lean angle is really critical on a spin turn. If the bike doesn’t want to turn, chances are you’ve got the bike too upright.
Jim: Okay. Anything else we should be cautious of while we’re doing this?
Ramey: Well, yeah. I would be very cautious of not getting addicted to it, because it’s so much fun.
Jim: It is. It definitely is. Of course, the only thing more fun than this, is actually sitting on it, and doing your turn.
Ramey: That’s what I was going to say, is…I mean, that’s the next training step. Once you can do these spinning turns standing still/standing on the ground, we do them sitting on the bike. Then it’s really fun.
Jim: Because, as you come out of it…well, you’re sitting on it. You can just put your butt down onto the seat, and away you go.
Ramey: Yeah. And the beauty of sitting turns, if you can do them left or right. Where standing, we tend to always do them to our left. This idea of training sequence… I want to go back to this. Same thing. Let’s put these steps up on the website, and do print out… Take some time to visualize each one of these steps. You can practice in your garage, engine off. You’re not going to do a spin turn there, but you can just say- okay, this is what I would do, and then I would do this next, and then I would be here, and then I would go there… Just create a mental picture of what you’re going to do before you go out and do it, and it’ll be a lot easier to do it in real life. It’s the mental side of motorcycling. If you don’t have a picture in your mind of what you’re trying to accomplish, it’s going to be so much harder to make it real. You’ve really got to create that picture, and then make it happen.
Jim: What do you think the difficulty level of this is? Let’s say if we put it on a scale of…I don’t know…1 to 5. 1 being easy, 5 being difficult.
Ramey: I know in the classes where we teach this, I think the degree of difficulty changes with the size of the bike. In the beginning, if someone wants to do this on a big GS, or 1190 or something, the bike creates a mental picture that’s overpowering. I just say- that’s no problem, park your bike, and grab one of my school bikes. Then learn to do the sequence, and do the practice on this bike, and then go over and grab your big. And their learning curve is very, very steep doing it that way. But if they try on the real big bikes to do this as a first step, it takes a lot longer to teach it and be able to pull it off. So, as far as degree of difficulty, it depends how it’s been taught.
Jim: Compared to side-stand turn. The side-stand turn would be really sort of a 1, wouldn’t it?
Ramey: Well, maybe a 2.
Jim: A 2? Okay.
Ramey: Yeah. Maybe a 2, whereas this is probably going to be a 4. But the reality of is that this is a really good tool for learning how to let the bike do what it was designed to do. That you’re not muscling the bike around. That you’re inviting movement. Once you get that down as a fundamental principle as a rider, then all of sudden, you start applying this principle to on the bike activities. Relax, and let the bike do it’s suspension. When you’re doing a turn, control the bike and invite the turn, instead of trying to force it. So this is a really great learning tool for more than just turning the bike around.
Jim: As we talk about this stuff, it always surprises me just how much you can do with a motorcycle.
Ramey: Yeah. And if you go to most of these classes, you don’t get into his stuff, because they don’t have time to teach the nuances. In the limited about of contact time between students and instructors, they’ve got to hit the things that you’re going to be doing the most. You’re going to accelerate, you’re going to brake, you’re going to turn, you’re going to do hills, maybe some sand, and thank you for coming…and it’s gone, it’s over. We just don’t have time to teach all these little steps of learning that connect you and your bike, and make riding in all conditions so pleasurable. I’ve taken lot of people around the world on training expeditions, and you come around the corner, and there’s six inches of sand… Heart rates go up, and adrenaline starts firing, and it’s like- no, no, relax. It’s going to be fun, and here’s why. Here’s how we’re going to do it. Then all of a sudden, it’s fun. It’s no longer stressful, because we’ve got the time to talk about it, and work our way through it.
Jim: Well, let’s do a recap, and then an assignment. Which I think you sort of gave already, but we’ll just do it again. So let’s do the recap, and then the assignment.
Ramey: Okay, so, basically what they’re going to do is; you lift the bike up, and raise the side stand. Turn your traction control off if you have it (if you can). First gear. Bars to the left. Then you’re going to step back a little bit, and take the bike into your right hip. Lean it into your hip, and make sure you’ve got plenty of lean angle. Remember; your inside boot (your left boot in this case) is going to be slightly forward. You’re going to look up, and then you’re going to add some gas and hold the rev steady. Then you’re going to use the clutch to break traction, and control your turn speed with your left hand. When you get to wherever you’re going/or how far into the turn you want to go, just push your clutch in, and you’re done. Get on, and ride away.
Jim: And it happens quick.
Ramey: Yeah. It happens quick. The thing is that, if you want to practice your clutch control, just consider- I’m only going to do about a quarter of a turn this time. I’m not going to go all the way around. Then practice that quarter of a turn. Take a breath, do another quarter of a turn. Take a breath, do another quarter of a turn. Then when you’re ready, do a 180. So the idea is that there’s a lot of different way you can work your way up to full performance.
Jim: It’s interesting how when we talk about these different things we can do with the bikes, that they all seem to be connected to that episode we did where you talking about looking for traction. It’s all about traction.
Ramey: Absolutely. For me, riding a motorcycle well is about traction management. So, when I’m working with the racers, all the time we’re talking about looking for traction. Where are we going to find it here? Where do you see the traction there? What are we going to do to maintain traction for this? So traction is a word that’s in our conversations constantly. We’re using it to accelerate, we’re using it to brake, we’re using it to turn…we’re using it to go uphills, and downhills… Traction is everything. So once you learn about traction management, you’re on the road to being a superb motorcycle rider.
Jim: So for the spin turn, for an assignment, to go out there and practice…what’s the best situation to practice in?
Ramey: Hard pack surface that’s flat. Make sure when you’re learning that you’ve got plenty of space around you. Don’t do this if you’re tired, or you’re thinking about other stuff. Focus on you, and your bike. And…take your time. Just play with it a little bit. Because it’s more about body position and technique than anything else. So, if you don’t have time to think about body position and technique, if you’re just trying to muscle your way through this, it’s not going to work for you. The other thing is that, when all this goes up on the website, just do a print out. Make yourself a little cheat sheet, and walk your way through it mentally, before you actually start the engine. Create that mental picture in your mind, and then give it a try. If you’re not sure about clutch control, and spinning the rear wheel loose, remember you can (before you start doing the turns) just do it straight ahead. On the bike, both feet down, looking straight up and ahead, bring your RPM’s up, and work with your clutch. See what it takes to break the rear wheel loose a little bit. Just go a foot or two, clutch in, and do it again. Just feel that clutch, and know where it is on that bike, on that surface. What’s it going to take? Then go do your spin turns.
Jim: Well, that’s two great turns for us. Or, like you said, two tools in our Rider Toolbox.
Ramey: Yeah. and the reality is, in the beginning, you might be a little nervous learning it. But once you get it, they’re fun. And like I said with the spin turns, it’s kind of a fun way to show off.
Jim: Coach Ramey Stroud, thank you very much. Always a pleasure to have you on.
Ramey: It’s my pleasure. I look forward to the next time. And, if any of you have some questions, or some ideas, something you want us to talk about…write in. Let us know. Maybe we’ll do a show just for you.
OUTRO
Jim (Narrate): I really enjoy talking to that guy. That was Coach Ramey Stroud. You can find out more about Coach and what he does by visiting his website… www.ridecoach.com
~END~
CREDITS:
Interviewer/Host: Jim Martin
Producer: Elizabeth Martin
Transcriptionist: Natasha Martin
Music:
BOXCAR RAG
Pop Rock Bed
Source: www.Audionautix.com
2015 stefsax Licensed to the public under http://creativecommons.org/licenses/by/2.5/ Verify at http://ccmixter.org/files/stefsax/7785
FunkyLong - Apple